Making a transition between two different wood floors is a good thing for your home decor, whether you are doing it for practical or aesthetic reasons.
Of course, you want this to be a smooth transition between areas and to have your wood floor look good at the end of this process. You’ve come to the right place to find the guarantee that that’s precisely how your flooring transition will go through in style. There is an option for your doorway.
To be specific, these are the things that you’ll find down below:
- How to transition between different wooden floors.
- The different type of transition pieces available
- Tips to making your floor transition easier
- Frequent questions on transitioning between floors
“As a certified flooring installer with three decades of hands-on experience, I can thoroughly assure you, the key to a seamless transition between two different types of wood flooring is to pay close attention to the details. Matching the color tones and the plank thickness is paramount. I also recommend using a transition strip in the same or similar wood, which can beautifully mask the changeover. Ultimately, precise application, meticulousness, and above all, patience will reward you with a flawless finish you can take pride in.”
Percival Jensen, Certified Flooring Installer
How To Transition Between Two Different Wood Floors Seamlessly
There are several ways to transition between two different wood floor types, but usually, this involves the use of some sort of transition strip.
First things first, measure the gap between your doors and the floor. You don’t want to install a piece that’s too tall for the doors to work properly. This also applies for the carpet.
The type of strip usually depends on whether you have two adjoining rooms, what floor colors you’re working with, whether you have an open floor plan, and the style or pattern of wooden floors you have in your areas.
To achieve a seamless transition between 2 types of floor you can use one of four techniques: Using a T-Molding, a seam binder, a metal track or a threshold piece.
1. Using A T-Molding
T-molding, or transition molding, is a T-shape transition strip that’s engineered to go between two adjoining floors.
It is usually seen between two rooms, or under the door when you go from one room to another. This strip is meant to sit on top of the threshold. This will give a slight edge to the joint that will mask the difference.
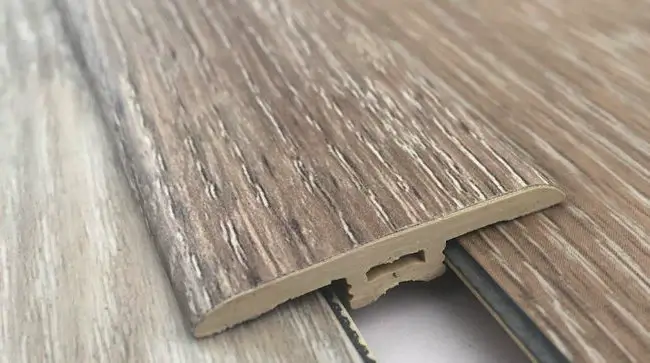
Besides wood flooring, this works with a variety of other materials too, like laminate flooring, tile, vinyl, cork or bamboo.
This is a practical choice to go with, as T-molding is something that can be changed out whenever you need it to, and very easily at that.
To install a T-molding you will need glue for for wood and a saw, in case you have to trim the edges. Place the molding between the two spaces that you want to connect and make sure it is the right size. Make all the adjustments needed and then apply a line of glue before installing the piece. Let it sit for one day, and you are done!
T-moldings can be usually purchased at the same place where you get your flooring, we recommend doing this so the molding matches the color of the floor.
2. Transition With A Seam Binder
Seam binders work a bit differently to T-molding, but the end product can look similar. A seam binder simply rests above the place where the two wood floors connect.
It too isn’t reserved only for hardwood floors, it’s a great transition piece between two floors of any kind. Even the same type of hardwood with different color shades can be effective.
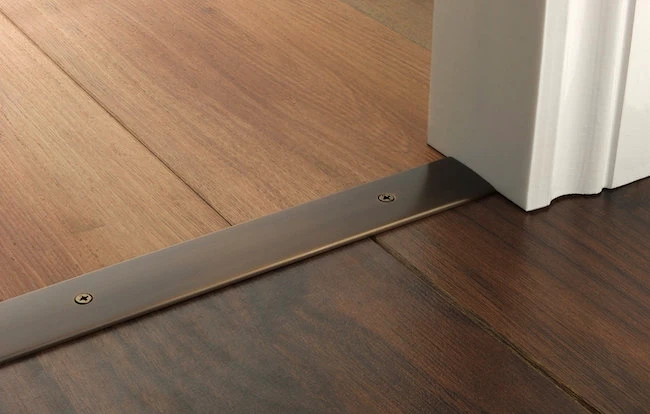
The type of strip is made from the same flooring material that the floor itself is made.
It is usually around five inches wide, although can be found in varying widths. It’s not rare to have different widths of seam binders throughout the same house, depending if they are matched to the width of door frames or applied in an open plan scenario where it is a different floor material type that divides the room rather than a wall.
These transition pieces are easy to install on hardwood floors as well as any other kind of wood flooring. Simply put it above the seem and screw it down with 1/8 screws.
You fasten it through the subfloor, which is easy as the binders come with drilled pilot holes.
As these transition pieces are not directly drilled through the flooring, your wooden floors will sustain no damage.
3. Installing Metal Track Transition Strip
Metal transition strips are the look many people seem to be going for in recent years. These transition strips are usually thin and straight, with the width being somewhere around 1/8 inch.
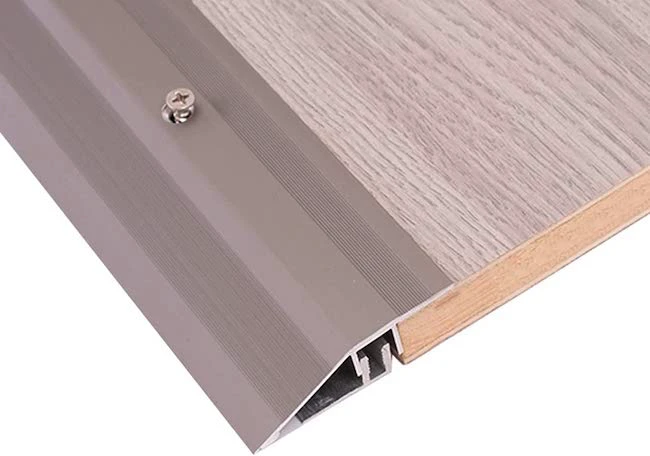
A metal transition strip is also often found as a tile buffer between different tiles, or between an accent tile and wood flooring.
All you need to do in order to have a metal transition between different wood floors is see that the two wood floors have a gap between them, and find a strip that will fit that exact gap. Make sure to buy the right type of material to avoid stains.
Make sure that you have the correct type of construction adhesive that will work and just mount the strip in it. Epoxy is one of the best options for metals.
4. Transition With A Threshold Piece
Threshold piece is probably the most seamless and simple solution, either between wood floors of different kinds, wood floors that transition from one room to another, or just from a wood floor to a floor that’s not made from the same hardwood or material.
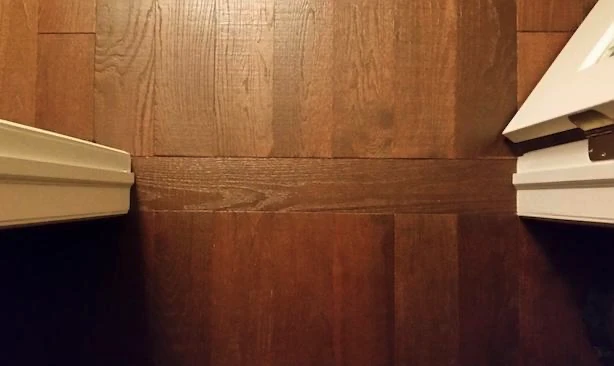
The threshold is more or less a flat rectangular block, and it’s around the thickness, making it flush with the hardwood flooring itself.
It’s different than a regular hardwood flooring plank, as it doesn’t have tongues.
Also, it doesn’t have to be the same as your wood floor, it can even be a thin accent tile in between. Some of the different flooring materials and textures that these planks are made include stone and marble, you can use this to improve the style of your border.
It’s very easy to install these between each other. All you need to do is order pieces that fit the buffer zone you need to fill in, ideally you want a board that goes well with your finishes, and if needed, cut them to be as long as you need in order to fit from one wood edge to another. You can apply gorilla glue for wood and let it sit for 24hrs, this will create a smooth transition with the same height.
Tips To Ease The Transition Between Two Different Wood Floors
Most of the ideas listed above are very easy to work with when dealing with a variety of wood floors & different patterns. However, there are some additional tips that will add to the practicality, as well as aesthetics of the transitions between your floors.
Work With Contrasting Patterns
When contrasting patterns between adjoining areas occurs, you will actually have the best results if you make the most of it.
Besides being the same color, and whether the planks are that same shape and same direction, you should also consider whether you should embrace the contrast and go for a completely different material.
The transition between the kitchen floor and the dining room floor is great for something like this. From a glossy finish to a rustic design, this could be an interesting transitional effect.
You can also change the direction of the planks. Going for a 90° angle change from room to room. This will make the transition look less awkward. You can also play around with the colors and lights of your room to make a transition more effective.
However, if you’re working with different wood floors and patterns, like dark wood floors on one side, and light wood on the other, definitely keep it like that, because if you have two floors that are similar, but not similar enough to be considered same, it will just give off the impression that you didn’t try hard enough to find the exact match.
Consider The Room Size
This is important to consider when thinking about the coloring you plan on working with, as some wood floors work better in a big open space, while others are better for something a little more closed off.
Generally, darker wood is better for big open floor plans, while smaller spaces like the living room tend to work better with lighter tones, like white oak. As a rule of thumbs, if you measure the distance between walls and if it is less than 10ft, it could be considered a small room.
Brazilian walnut is very popular among woods right now, and it does look stunning, but if you’re working with limited space, it probably isn’t what you should go for. It is not the most expensive option, starting at $7 per square foot.
Other Flooring Types To Consider
Finally, if nothing works with the two different hardwood flooring materials you have, it might be the time to change one of the two.
Going for a completely different flooring styles can be a big project, as hardwood floors can be hard to take out, but it’s absolutely doable. It’s a good idea to look for examples in stores. And there is always the option to hire a professional service, they usually chare around $8 per square foot.
Going for a nice stone or tile can be a great option, especially if you’re living somewhere where it gets a bit warmer, or if the room you’re dealing with is the kitchen. You can adapt it to be contemporary or traditional style. So don’t leave out this possibility completely! Another option to consider is acacia wood, which is known for its durability and unique grain patterns!
And also, cleaning hardwood floors can be a bit challenging and time consuming, so there’s no harm in having less of them. If you’re experiencing issues with your current flooring, such as lifting laminate, it might be a good time to consider a transition to a different flooring type.
References
https://www.hgtv.com/how-to/home-improvement/your-guide-to-the-different-types-of-wood-flooring
https://www.thespruce.com/guide-to-basic-floor-transition-strips-1821708

